
Some of our biggest concerns at a Bug Out Location (BOL) will be food and food storage. Dairy products are an important part of a balanced diet, but they are the most difficult to store, both short and long-term. Our ancestors stored milk over the long-term by turning it into cheese, and you can too. It is not difficult. We’ll explore a couple of different simple homemade cheeses and how to make them.
Cheese is simply the solid part of milk that is separated out and dried. Cheeses fall basically into two groups – soft and hard. Soft cheeses, such as cottage cheese and mozzarella, are ready to eat almost as soon as they are made, but do not keep without refrigeration, and are usually pretty tasteless, as they are not aged. Hard cheeses require aging to develop their taste, and can be waxed to store them during the aging period (and beyond) without refrigeration. Aging allows the lactose (milk sugar) in the cheese to break down into lactic acid, which gives the ‘sharp’ taste to the cheese. The ‘sharpness’ or flavor of a cheese is determined by the amount of time it is allowed to age, up to a point.
Simple cheese can be made as simply as putting a small amount of acid, such as lemon juice or vinegar, into milk to ‘clabber’ or coagulate it. You can produce a very close approximation to what we know as “cottage” cheese simply by putting a few drops of acid into milk, capturing the resulting curd with a slotted spoon, cutting it into desired-size pieces, and then re-creaming it by adding milk or cream back onto the pieces. This is a very basic simple cheese, but like store-bought cottage cheese, will not keep very long and cannot be stored without refrigeration.
Making Farmer Cheese
So let’s make some basic “farmer” cheese. You will need one gallon of whole milk, ¼ rennet tablet dissolved in 1/2 cup of water, and 2 tsp. of kosher or canning salt. Rennet is a chemical that coagulates milk into cheese better than acid alone, and is necessary to make hard cheeses. It is taken from the stomach lining of a calf, and is solidified into tablets for easy storage and use. It can be obtained from farm supply stores or on-line. The tablets are scored for easy division. Cut a rennet tablet into fourths, and put one fourth tablet into a half cup of water and let it dissolve. In addition, you will need a pot big enough to hold a gallon of milk comfortably, an accurate thermometer that will measure from 80 to 220 degrees F., and a way to press the cheese after it is made. We’ll discuss some simple ways to do that shortly.
Put the gallon of milk in your pot on the stove on the LOWEST heat possible. Put your thermometer in the milk and watch the temperature as it slowly rises. Stir it often to keep the temperature even. When it gets to around 86 degrees F., put in the dissolved rennet. Continue to stir and watch the temperature until you get to 101 degrees F. You should now have a mixture of curds (the cheese) and whey (the liquid left behind). Turn the heat off and put a lid on the pot. DO NOT exceed 101 degrees, as the bacteria that work in the cheesemaking process are killed by temperatures above 102 degrees F.
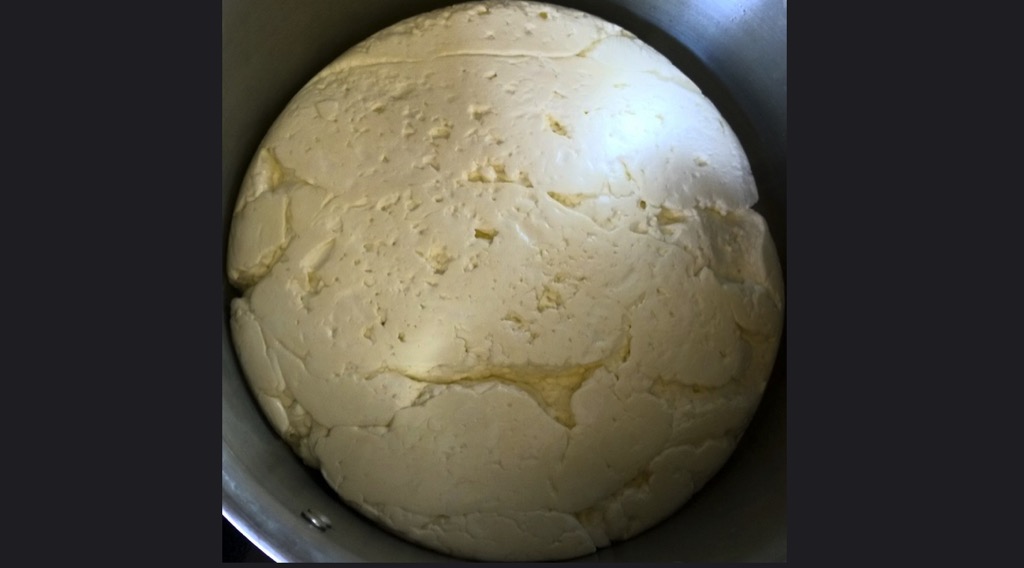
Allow the curds and whey to rest for an hour. After an hour, use a slotted spoon to get as much of the curd out of the pot as you can, and put it into a colander to drain. Pour the rest of the whey through a second colander to catch as much of the remaining curd as you can. The whey can either be thrown away, or used to make bread or other recipes, [or as animal feed if you keep dogs, cats, pigs, or chickens.] Press and squeeze the curds in the colander to press as much of the remaining whey out of them as possible. Sprinkle a tsp. of salt onto the curd in the colander, and work the curd with your fingers to distribute the salt around in it. Then, turn the curd over and put the other tsp. of salt on it, and repeat the process.
The curd now has to be pressed to condense it, and to remove the remaining whey. I use two cottage cheese containers of the same size that are a slip fit inside one another, one to hold the curd, and the other to put pressure on the top of the curd. Put the curd in one container, put the bottom of the other container on top of the curd, and then apply pressure with a cheese press, or if you don’t have one, place some books or other weight on top of the upper container to put pressure on the cheese. I have put the cheese containers on the floor with two kitchen chairs on either side of them to keep the stack of books from tipping over. After several minutes, take the weight back off and dump out the whey that has separated out. The cheese will tend to go up into the space between the containers along with the whey, so take a knife and cut that cheese off and place it back on top of the main block, then reapply the pressure. Do this several times over the space of an hour to get as much whey out of it as you can, then allow it to sit overnight with the pressure on it.
The next morning, take the block of cheese out of the container, put it on a paper towel on a plate, and let it sit out in a cool place exposed to the air so it can form a rind on the outside. Turn the cheese daily, so that the part that was on the bottom can get some air so it forms a rind as well. Let it sit exposed to the air for a week. You will notice that at first, the cheese has no odor at all, but after several days of drying, it will start to smell like cheese, as it begins to ‘age’.
The cheese must now be waxed or paraffined to keep it from molding or spoiling. Canning wax or paraffin is available at most farm and grocery stores. I got an old saucepan and lid from Goodwill and I dedicate their use to waxing cheeses. When I am done with the wax, I just take the pan off the heat, put the lid on the pan, and let it sit in a cool place to let the wax reharden, and that’s how I store it without tying up one of our good pans.
Important Safety Note: The long-standing advice is to use a double boiler to melt wax, but I have found that you don’t have to do so if you are very careful and only if you have a gas or propane stovetop that can produce a very low flame. Do not attempt this shortcut if you have an electric stovetop. Note that melted wax is VERY FLAMMABLE, so use care!
Put your pan with the wax on the lowest flame possible on your stove. After the wax melts, continue heating it to at least 212 degrees to kill the mold spores on the cheese. Scrape off any mold that may already be on the cheese. Tie a piece of clean string around your block of cheese, and use the string to lower the cheese into the melted wax. Leave it in there for twenty seconds or so, and turn it around and over so that all the outside surface of the cheese gets covered. Remove the cheese from the wax and allow the excess wax to drip off, then hang it somewhere from the string so that the wax will harden. After it is cool, you can use a Sharpie marker to write the date on the wax coating on the cheese, so you can easily keep track of how long it has aged.
Let the cheese hang and age in a cool place for around six weeks before eating. The temperature at which you are storing it will determine how fast it ages. You will have to cut the wax and rind off the cheese with a sharp knife before eating. It will have a number of small air pockets in it, depending on how aggressively you were pressing it when you made it. This cheese has a pretty high melting point, so if you want to use it where it will need to be melted, anticipate putting more heat on it than softer cheeses. When I put it on cheeseburgers, I put the cheese on the grilling burgers about two minutes earlier than I do with store-bought cheese, like American cheese.
Making Mozzarella
Mozzarella is a soft cheese that is made by a slightly different process. It is not ‘aged’ to form its flavor — it has to be used within a few days after manufacture so it doesn’t spoil or take on off-odors.
You will need one gallon of milk, ¼ rennet tablet dissolved in 1/2 cup water, 1 ½ tsp. of citric acid dissolved in ¼ cup of water, and two tsp. kosher salt. Put your gallon of milk with the dissolved citric acid in a pot, and raise the temperature over the lowest flame possible while stirring, until the milk reaches 86 degrees F. Remove from heat, add the dissolved rennet, and allow to sit for about five minutes. Take a long dull knife, long enough to reach the bottom of the pot, and cut the curd both directions into 1” squares. Reapply low heat and slowly heat until the temperature reaches 101 degrees F. Shut off the heat and use a slotted spoon to put the curds in a colander to drain. Discard the whey, or use it to make bread, etc.
The cheese now has to be stretched to get it to the right consistency. Heat up the cheese in the microwave (or in a water bath on the stove if you don’t have access to a microwave oven) till it reaches approximately 140 degrees – usually around sixty seconds on High. The curds should now have the consistency of the melted cheese you get on a hot pizza. Sprinkle half of the salt on the cheese, then put on rubber gloves to protect your hands. Pick up your ball of hot cheese and work the salt into it, then turn it over and sprinkle the other half of the salt on the other side and work it in. Squeeze it while you are doing this to get as much leftover whey out as you can. Then, take the ball of cheese between your hands and draw it out and stretch it like taffy, then put it back together in a ball and repeat. At first, it will not be very stretchy and will break apart easily. Go slow. Keep at it, and the consistency will change to where it is more like taffy or molten cheese and will stretch out easily. Keep at it for three or four minutes till no more improvement is noted, then pack it into a clean container (like a cottage cheese container) and put it in the refrigerator to harden.
After overnight in the refrigerator, it will have nearly the consistency of store-bought mozzarella. Take your block of cheese out of the container and pat it dry with a paper towel to remove any remaining whey. It is softer than store-bought mozzarella, so it slices easier than it shreds. Slice it up and put it on homemade pizza – it is delicious!
Conclusion
More sophisticated cheeses are made by using particular starter cultures to start them, and/or by using different kinds of milk, such as goat’s or sheep’s milk, to produce different tastes and textures. If these simple cheeses pique your curiosity to go further with cheesemaking, get one of the many books on the topic and cheese away!