
Building a shelter is one of the first things you want to figure out in a survival situation. This is because in most scenarios you may be forced to stay the night in your current location.
It’s important to have an emergency shelter in your bag; however, a lack of planning or other circumstances can leave you empty-handed when you need it most.
A lean-to shelter is a versatile and easy-to-construct survival shelter. There are multiple methods by which you can build a lean-to using different materials and designs.
This article will teach you how to take advantage of the materials around you to construct an effective emergency shelter.
What Is a Lean-To Survival Shelter?
A lean-to is a simple structure that leans up against a crossbar that you have secured between two trees. It can be created using materials found around you or with common gear you’d take camping, such as a tarp and paracord.
Lean-to shelters are designed to be easy, short-term solutions when you need cover. Properly built lean-toès can provide a dry place to sleep and protection from bad weather.
You don’t need to be athletic to build them and the risk of getting an injury from it collapsing is minimal. Just be sure to check the materials for stability and be diligent in securing all of the joints in your shelter.
Common Resources You Can Use For Construction
In a survival situation, the materials around you will be your main limitation. Luckily, lean-to requires only a few resources that you can find in any natural environment.
You’ll need some wooden poles which can be scavenged off the forest floor or cut as dead-standing trees. These will be the frame of your shelter which will hold up the main wall.
Finding some smaller sticks is crucial for building up the wall once the frame is in place.
If you don’t have a tarp handy you can use coniferous boughs and debris like fallen tree leaves and grasses to build up the insulation on the walls of your lean-to.
Tools You Can Use To Your Advantage
Using tools such as a saw or an axe can help in the search for finding good-quality materials.
While you can certainly use wood you’ve found on the ground, oftentimes it will be punky or saturated with water if it’s been in direct contact.
This affects the structural integrity of the resources which could cause collapse and lead to injury.
A rope or paracord is another great tool that can help by lashing the poles between two trees. It just adds another layer of rigidity to the lean-to structure itself.
If you have to make a lean-to in the winter then using debris may be tricky as the landscape is usually covered in snow.
Having a tarp to create a watertight layer on your lean-to helps prevent precipitation from entering and heat from leaving. These tools will make building the lean-to easier but they aren’t necessary for construction.
It’s recommended that you bring a paracord, a tarp, and a saw if you’re ever going out to a remote location but in a pinch, you can construct all of the components you need with your hands and the natural materials around you.
How to Choose The Right Location For Your Lean-To
As with building any structure, the location matters just as much as the lean-to itself.
I mean, there is no sense in building a shelter in an area that floods if it rains. In a survival situation, your mind may be in a fight or flight response which can inhibit rational thinking.
Here are some key things to remember when selecting a location.
Check The Wind Direction
One side of your lean-to is going to be the entryway into the shelter, meaning it will be subject to the wind direction.
If it’s raining or snowing outside then you need to construct the lean-to to accommodate for how it’s falling.
For example, if you build your shelter with the entrance facing into the current wind direction then any precipitation will be flung inside.
Having the weatherproofed wall facing the wind will not only protect you from the elements but also keep the heat inside.
There is always the possibility of wind changing direction so it’s up to you to make the best call in your particular situation.
Holding up a bandanna or light cloth material will help you determine the wind direction by observing how it moves.
If you’re in stormy weather, however, the wind can be moving in many directions. In this case, try to position your shelter close to a rock face or big tree so that you have multiple wind blocks around you.
Find The Flattest Terrain
Building a lean-to on sloped terrain poses a couple of issues for you. Sloped terrain acts as a highway for the rain to run down.
If you’re sleeping on the ground and there is a heavy rainstorm then you might wake up to the rivulets flowing underneath you.
Additionally, sleeping at an angle is uncomfortable and not good for circulation.
Tree roots and uncomfortable rocks will further negatively affect your sleep, restricting the amount of rest your body will get.
Before you start construction it’s best to lie flat on the spot where you want your bed. Feel out any nooks and crannies as you lie down and roll around, much like you would if you were sleeping.
Scout For Nearby Resources
Building your shelter is at the top of the survival checklist, but once that’s done you’ll need to address the other items.
Have a look at the area around you before starting to build a lean-to. Check for important resources like:
- A running water source such as a river or spring
- Ample dry firewood
- Shelter construction materials
- Wild edibles (depending on the season)
- Game trails
- Open space suitable for signaling efforts
If you set up in an area where there aren’t any resources around you then you’ll have to trek out and find them.
Having a lean-to in an area with no resources isn’t necessarily a bad thing, it can be used as a satellite camp if you’re stuck out in the wilderness for an extended period.
How To Build A Lean-To: 3 Methods Step by Step
While the general shape of the structure will look the same, there are 3 main methods by which you can build it depending on your circumstances.
All of these can be built without tools if you find trees that have already been downed or are ready to fall over.
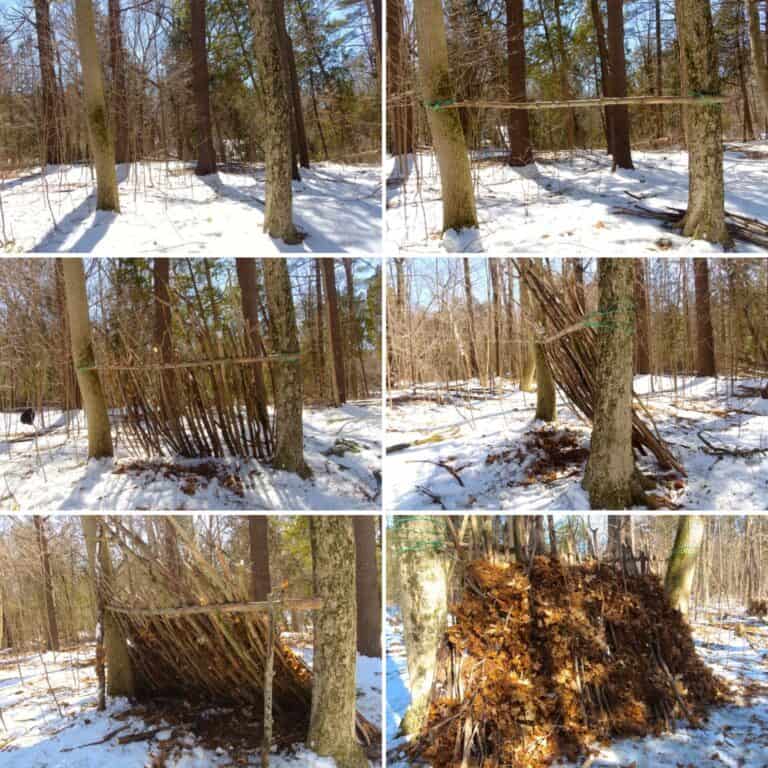
Method 1: Crossbar Between Two Trees
This is the most common of the lean-to construction styles and requires some cordage to fasten the main crossbar.
Using paracord or rope is preferred, but you can also create your cordage using grasses or the inner bark of some trees.
Using a wood saw is another tool that can help make the job easier. A lot of dead-standing trees are perfect to use for a lean-to but need to be cut down first.
Building your shelter using this method opens up the possibility of expansion as you can extend the roofline away from the sloping rear wall to provide overhead shelter.
1. Finding the Right Spot
You’re going to have to find two live trees approximately 5 to 6 feet apart. Ensure that the trees you choose are sturdy because you’ll be leaning the frame of your lean-to up against it.
Check above the trees to make sure that there are no large branches overhead. During a nasty storm, these branches could come down on top of you, hence the term “widowmakers”.
2. Find Your Crossbar
You’ll need to find a piece of wood that is the span of the distance between the two trees, with some overlap to tie it to each one. This will be the crossbar where you build the wall.
A good length will be about 6-7 feet with a diameter thick enough to support the weight of the wood for the wall. Try to aim for about 4-5 inches in diameter to have enough support.
3. Lash the Crossbar
After stripping your crossbar of branches and loose bark it’s time to secure it to the trees. Tying the crossbar to each tree requires some cordage and your shoulder.
Hoist one end of the crossbar pole onto the shoulder closest to the tree. This frees up your hands to secure the wood using the square lashing style.
An alternative method is to simply wrap the cordage in an over-and-under fashion between the crossbar and tree until secure. Repeat this step on the other side using the second tree.
4. Building the Rear Wall
The main cover for this shelter is the rear wall which will consist of thick pieces of wood leaning against the crossbar to form a block against the weather.
You can use a variety of wood thicknesses for the wall but just make sure they’re long enough to rest up against the crossbar you made. You should have a 45-degree angle for the slope of the rear wall.
You’re probably going to need quite a few long pieces of wood to fill in the wall. Using a variety of wood thicknesses is best to optimize coverage. You want enough wood on the back of your shelter wall to stop the majority of wind coming through.
Another tip would be to lash the outside poles to the crossbar to provide additional stability so the wall has less of a chance of moving and potentially collapsing.
5. Insulate the Rear Wall
At this point, your wall should cause a noticeable drop in wind intensity, but the job isn’t quite done yet.
Using forest debris, conifer boughs, and more sticks to fill in any place where you see light coming through will ensure that your shelter stays weathertight.
The weight of the insulation will keep the rear wall from moving out of place while protecting you from inclement weather.
6. Don’t Forget the Side Walls
There is still a gap between the rear wall and the tree that the crossbar is lashed to that needs to be closed up to provide more protection.
The easiest way is to use your saw to cut logs into the length of the gap you need to fill. Then pile the processed logs on top of each other to form the wall. You can hammer in a wood stake on either side of the wall to keep it from buckling.
Crossbar Variation
There is a variation of the traditional crossbar method that doesn’t need you to construct the crossbar piece. Instead, you can use part of the environment to act as the crossbar.
If you find a large downed tree on its side you can lay branches at a 45-degree angle from the ground to the top of the log.
This also works if you find an exposed rock that is about 4-5 feet tall. The result is a lean-to shelter with a smaller entrance and “living space”, perfect for short stays in intense weather.
You can insulate the shelter using debris on the rear wall and boughs on the inside floor. Make sure to wall off one end of the shelter with pieces of wood, preferably whichever way the wind is blowing from.
Method 2: The “Y” Poles
In some situations, you might not have any cordage available to construct a traditional lean-to.
In that case, you’ll want to look for long pieces of wood that have a “Y” in them, where you can secure a crossbar where the branch splits.
If you have a saw or axe handy the “Y” poles can be created from dead-standing trees. If you don’t, keep an eye out for sturdy, dead branches or slimmer trees that you can push over.
For this setup, you’ll need to construct two “Y” poles as well as a crossbar that will span them. Additionally, you’ll need to collect long pieces of wood to set against the rear wall.
1. Construct the Two “Y” Poles
Find two pieces of wood roughly your height or approx 5-6 feet tall. The poles will need to have a split in them where they branch off in a “Y” shape. Take off any sharp branches sticking out until you have a smooth length of wood.
2. Create the Crossbar
Much like the previous shelter, fashion a crossbar and secure it in the “Y” of each support. The result is the ridgepole that you will be building your rear wall against.
3. Build the Rear and Side Walls
Laying longer, thinner poles vertically across the rear wall at a 45-degree angle will give you enough room to lay down. You want enough to use enough branches to close in the wall itself, although you’re still going to have some gaps until you insulate.
4. Insulate
Start filling all of the gaps with leaves and moss. Once that’s done then you can start piling on debris and boughs to add even more insulation value to your shelter.
There’s a variation of this shelter where you can still use two trees in addition to the “Y” poles. Simply buttress the “Y” poles up against the trees for the crossbar instead of tying it directly to the trees.
Method 3: The Tarp Lean-To
Building a lean-to with a tarp requires two trees and either a crossbar or ridgeline as the anchor point. The bigger the tarp, the larger the shelter but a 10×10 square tarp with grommets or tie-off points can do the job. You’ll want to make sure that the back of your tarp is facing the wind.
1. Secure a Crossbar
Create a ridgeline between the two trees with paracord, tightening each end using a taut line hitch knot.
2. Attach the Tarp
Attach one end of the tarp to the ridgeline and then anchor the bottom of it to the ground using stakes. This will make it taut and stop it from becoming loose in heavy winds.
3. Build the Side Walls
As with the other lean-to styles, there will still be a gap at the sides of the shelter that you can fill using logs and other debris.
A tarp lean-to is a great emergency shelter that you can use for a couple of days in adverse weather. It requires very little manual labor and can be put up in a fraction of the time it takes to use natural materials.
Conclusion
Lean-to shelters are quick to put up and don’t require a lot of physical strength to haul the materials.
They are perfect for solo occupancy as their size makes it easy to maintain warmth. In a survival situation where rational thinking may be difficult, a lean-to is easy to remember and simple to build.
?Lean-To FAQ
Every lean-to shelter will be slightly different based on the scenario and resources. Here are some of the most common questions about building a lean-to.
Due to space limitations, a thin foam sleeping pad and sleeping bag are ideal to use in a lean-to shelter.
Building up layers of debris and wood on the rear of the shelter until you can’t see daylight for the best weatherproofing effect.
You’ll want the insulation layer about as thick as the length of your arm for it to be effective.
Perrin is an adventure guide and naturalist currently living a nomadic life in the Canadian wilderness. His education and expertise is in wilderness survival and wildlife tracking. He enjoys teaching people about the outdoors and has managed large groups on expeditions.
With several accredited certifications, including being a wilderness first responder and a leave no trace expert, Perrin believes it is important for all of us to reconnect with the natural world.


