
One of the most iconic pieces of headwear in the world, and one that is instantly recognizable, is the shemagh. Basically a giant bandana, this staple of Middle Eastern tradition has become a fashionable accessory elsewhere in the world and an indispensable part of a warfighter’s kit in arid, desert climates.
They work wonderfully for keeping the sun off your head, face, and neck and sand out of your mouth, nose, and eyes. But compared to a bandana, it’s a lot more involved in tying on a shemagh, though you can learn easily enough thanks to our step-by-step guide.
Below you’ll find three proven ways for tying a shemagh, each suitable for different purposes and preferences. Let’s get right into it!
Military Style
The first method is the so-called military style, greatly preferred by military forces, as you might imagine, because it’s quicker and easier to don hastily when protection is needed.
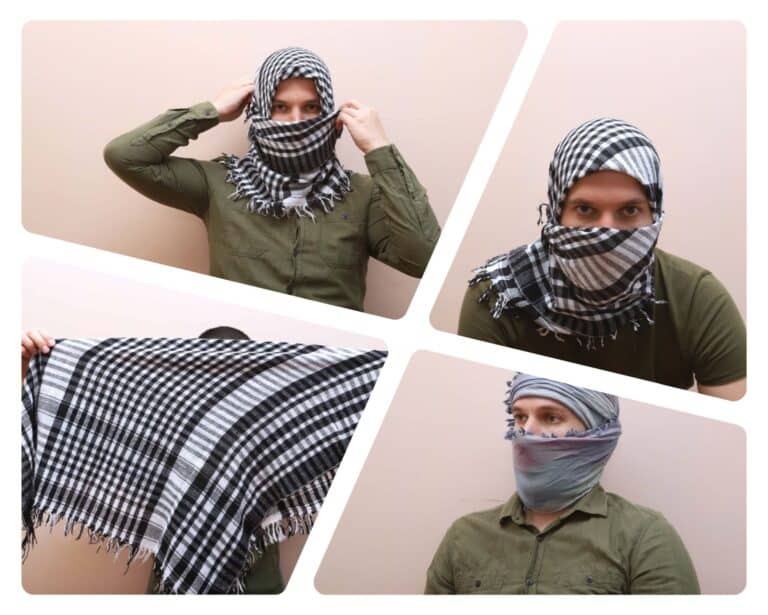
This is a great one to start with since it is so similar to tying a bandana on, something you might already be used to…

Step 1: Fold the shemagh in half. Holding the shemagh lengthwise, bring one corner to another to make a triangle with the corner hanging down in front of you. Being rectangular, it won’t be perfectly symmetrical, and that’s okay.

Step 2: Place over the head. Pick out a spot that is about 3/4 of the way down the folded edge. Place this point in the middle of your forehead with the corners behind you.
If you are right-handed, the short end should be on the left side of your head. Keep hold of the folded edge the entire time. See picture for reference:

Step 3: Bring the short end under the chin. Grab the corner at the short end along the folded edge. Wrap snugly directly under your chin, and bring it up along the right side of your face, pointing upward.

Step 4: Wrap the long end around the front of the face. Keeping everything taut, take hold of the short end with your right hand now. Hold it in place, then use your left hand to bring the long end around in front of your face, covering your nose.

Step 5: Continue wrapping the long end. Go all the way around behind your head until the corner overlaps the short end you are still holding on to.
Step 6: Tie. Make sure everything is snug enough, then tie both corners together with a pair of overhand knots.

Step 7: Adjust. Make sure the shemagh is secure over your nose, under your chin, and across the top of your head and forehead. Undo the knot and retie it if necessary to make adjustments.
Step 8: Finished! You’re ready to face the wild.
With just a little bit of practice, the military-style shemagh wrap goes on very quickly. It’s my favorite method for getting protection in a hurry.
Bedouin Style
The Bedouin style wrap is slightly more involved, but more compact and very quick to take off when required. It also allows you to uncover your mouth if you want without untying the entire shemagh…

Step 1: Fold the shemagh in half. Holding the fabric lengthwise, bring two opposite corners together. Again, it won’t be perfectly symmetrical, and that’s okay.

Step 2: Lay the shemagh on the head. Place the middle of the fold on your forehead with the corner pointing backwards behind you.

Step 3: Fold the bottom edge up, criscross ends. Fold about two or two and a half inches of material upward, then cross the two loose corners around the back of your head (without tying them):

Step 4: Wrap the first side. Gather one side of the material and wrap it around your head, staying above your eyes.

wrapping first end around forehead
Step 5: Tuck first side. After completing one complete wrap, tuck the end into the fold you made earlier to secure it.

Step 6: Wrap the second side. Now gather the remaining material from the other side:

…and bring it around covering your nose and mouth:

Step 7. securing second side behind head
After covering the front of your face, bring it back up, pull it snug, and then secure the end into the fold you made previously, as you did with the first wrap.

Step 7: Adjust. Take a moment to make sure everything is snug and secure. If you can’t secure the ends of the fabric, simply start over, make the initial fold, and keep everything tight and taut as you wrap. If you keep it tight, it will secure the ends when you tuck them in.
Step 8: Done! You are ready to go. If you want to uncover your mouth, you can simply loosen it up and pull it free where you tucked it, and it can hang down without undoing the entire shemagh.
This method isn’t as intuitive as the military one we looked at first, but again with just a couple of repetitions, you’ll soon be able to put it on in just a couple of seconds, and then you can cover and uncover your mouth and nose as needed.
Traditional Style
The traditional style of tying a shemagh is super quick and easy, though it’s an all-or-nothing proposition.

If you don’t get the tension and placement right the first time, you’ll have to undo the whole thing to adjust it, and unlike the Bedouin style, you cannot just uncover your mouth if you want to. Nonetheless, it is a good method to know…
Step 1: Fold the shemagh in half. Holding it lengthwise, bring two opposite corners together. Just a reminder, it won’t be even and perfect, but that’s okay.

Step 2: Drape the shemagh over the top of your head. The corners hanging down in front of you. See picture:

Step 3: Bring the left side tightly under the chin. With your left hand, grab the right side hanging down in front of you, bunch it up, and then bring it under your chin tightly and up along the left side of your head.

Step 4: Wrap the right side in front. Now with your right hand, grab the left corner, lift it up so it is even with your nose, and then bring it across in front of your face.
Make sure you are still holding the right side you brought under your chin tightly so that everything stays snug; otherwise, it won’t hold.

Step 5: Bring both ends behind the head. Holding on to both ends still, continue on and bring them both behind your head, tying them off with two overhand knots to secure them.

Step 6: Check and adjust. Make sure the fabric up front covering your nose is secure, but not mashing it flat; otherwise, you won’t be able to stand it for long. If it’s too tight or not tight enough, start over at the point where you have the fabric hanging down in front of you.
Step 7: Done! After you get the tension just right, you’ll be all set.
The traditional method is deceptively simple. You’ve got to get the tension just right for it to be comfortable and also stay secure, and it takes a couple of tries before you nail it.
But once you do, it’ll be just like tying your shoes: you’ll be able to do it without thinking about it and get it perfect every time.


Tom Marlowe practically grew up with a gun in his hand, and has held all kinds of jobs in the gun industry: range safety, sales, instruction and consulting, Tom has the experience to help civilian shooters figure out what will work best for them.