

SHTFPreparedness may collect a share of sales or other compensation from the links on this page.
Knot-tying is an outdoor skill that all campers should know before going on an adventure. There are perhaps thousands of versions of knot-tying.
The average camper should know how to tie a knot in a few different ways. Knot-tying kits are available for purchase, but they take all the fun out of camping and tying your own knot masterpieces.
In our guide, we’ll share how to tie a camping knot. The following are seven useful knot ties that every camper should know.
Camping Knots You Should Know About
Once you know these knot-tying techniques, you’ll be all set to go on your next camping adventure. Let’s begin!
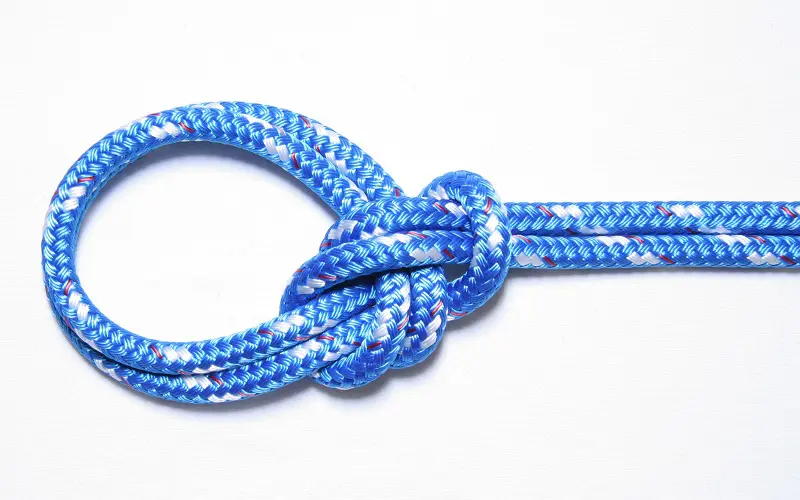
1. The Bowline Knot
This is the most useful knot that any camper should know. The bowline knot is very secure, strong, and stable.
Its most common use is to create a secure loop at the end of a line. This type of knot has the advantage of still untying easily even after enduring a lot of tension.
For bowline camping knots, the best ropes to use are WILDAIR survivor cord or TECEUM paracord ropes.
Instructions
- Take one end of the first rope and create a loop.
- Make sure that the rope’s standing end is underneath the loop.
- Take the second rope and insert it under the end of the first rope loop.
- Go around the first rope’s standing section.
- Then bring it down into the first rope’s loop.
- To fasten the knot, pull both ends.
2. The Clove Hitch Knot
The clove hitch knot is a simple knot that can secure a rope or a pole. This knot is also easy to tie and untie.
You can use the SE Survivor Series 7 survivor cord or the BESWIN Parachute Cord 550, which work best for this type of knot.
Instructions
- Take the loose end of the rope around the pole.
- Underneath the standing rope, bring the loose end around.
- Take the loose end and wrap it around the pole’s back.
- Take the loose end and pull it down into the top loop.
- To fasten the knot, pull both ends.
3. The Two Half Hitches Knot
Usually, people use this knot to secure a rope to a tree, a boat, or a pole. You can also use it as a security knot to enhance the strength of the primary knot.
Instructions
- Wrap the rope’s loose end around the post.
- Take the loose end of the rope and bring it under the rope’s standing part.
- Work your way around and down through the loop, then tighten it against the pole.
- Underneath the standing rope, bring the loose end back around.
- Bring the loose end over and down through the loop that you’ve just created.
- Pull the rope tight to secure it.
4. The Sheet-Bend Knot
You can use this knot to tie two separate ropes together. The ropes can also be different types, like SGT Knots Tarred Twine Ropes or Rapid Rope Multipurpose Ropes.
For example, you can tie twine rope to paracord rope.
Instructions
- Shape a loop at the end of one of the ropes.
- Take the end of the second rope and bring it up through the loop you created with the first rope.
- Bring the second rope’s end around and underneath the first rope’s shorter and longer ends.
- Take the end of the second rope and bring it down through the loop you created with the second rope.
- Tighten and secure the knot.
5. The Taut Knot
This type of knot can come in handy when you need to adjust the lines of your Pacific Pass Camping Tent to reduce some of the tension on the lines.
For this type of knot, 620 lbs of Survivor Cord or 1000 lbs of Survivor Cord XT ropes work best.
Instructions
- Take the loose end of the rope and pull it around the tent stake.
- Bring the loose end of the rope underneath the standing rope to create a loop.
- To form a coil, take the loose end of the rope and bring it over into the loop.
- Repeat step three to form a second coil.
- Bring the loose end of the rope back towards you and underneath the standing rope (to form a D).
- Take the loose end and bring it down into the loop (or the D) to form three coils.
- The knot should be able to adjust and still stay secure.
6. The Double Fisherman’s Knot
These camping knots can securely tie two ropes together or fasten the ends of a rope to form a loop.
These types of knots slide together to create a secure bond. You can also use this type of knot to create handles on canoes or kayaks.
To make these knots, you can use KINGLAKE 328-foot natural jute twine ropes, WEREWOLVES 650-pound paracord ropes, or GOLBERG 550-pound paracord ropes.
Instructions
- Place the two ropes in parallel next to each other.
- Loop the free ends of one rope two times around the second rope.
- Now pass the first rope back through the loops inside.
- Repeat the above steps with the second rope.
- Pull the loose ends to tighten the knots.
7. The Figure Eight Knot
These camping knots are also known as stopper knots, which means that they are generally used at the end of a rope to ensure that things you may have on the rope do not come off.
It’s also a basic knot in Grandway Paracord 100-foot ropes that mountain climbers use to secure themselves.
Instructions
- Make a loop so that the loose end is under the standing rope.
- Take the loose end and bring it around to the left, above the loop, and over the standing rope.
- Bring the loose end up through the loop and pull it tight. You should have a knot shaped like an eight.
Final Thoughts
We trust that we’ve shed some light on the art of tying a knot.
You can practice these camping knot techniques before you go on your next camping adventure!